By: Jay Campbell
If you are a Zwifter, you may have experienced a bit of bike-envy when a glowing-neon-bike came in and out of your view. [A “Zwifter” is a user of Zwift, “… a massively multiplayer online cycling and running physical training program that enables users to interact, train and compete in a virtual world.” -Wikipedia] That neon bike is commonly known as the “Tron” bike and formally referred to as the “Zwift Concept Z1 Bike.” It is colorful and it is fast. This article will divulge some hacks to unlock your Tron Bike quicker.
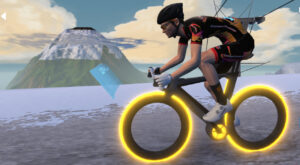
Author’s avatar on his Zwift Concept Z1 (Tron) bike on top of the Radio Tower climb with Alpe du Zwift in the background. He accumulated 65% of the 164,000 feet of elevation in the final 7 weeks. The hacks enabled increased weekly-elevations of 7113, 6115, 14547, 16710, 15925, 21512, and 24540 feet. Image used by permission of Zwift.com.
There are some basics to “unlocking” the Tron bike that I will not cover in detail. For example, you need to sign up for the Everest Challenge (I wish someone had told me that three years ago). Those basics have been covered by others [https://zwiftinsider.com/tron-bike/].
The main requirement to unlock the Tron is the accumulation of 50 kilometers of climbing…. that’s 164,042 feet. If you rode the Tempus Fugit route every day (52 feet of climb) it would take you 3,155 days. If you rode the Road to Sky route every day (3428 feet) it would take you 48 days.
Another way to look at this is … How much time would it take to accumulate 164,042 feet at a given speed on a given slope? For example, 10 mph up a 5% slope equals 0.5 miles-of-climb-per-hour or 2640 feet-per-hour.
Vup = V x slope — [Rate-of-Climb = bike velocity x slope]
That Rate-of-Climb would require 62 hours to unlock the Tron bike. From this you can see that getting the Tron bike is not an impossible task if you ride some hilly routes (not Tempus Fugit). But before we talk about routes, let’s talk about the physics.
Your pedal power (watts) that moves your Zwift avatar is expended (for simplification) in three ways: 1) changing elevation, 2) rolling and frictional losses and 3) aero drag losses.
The power required to maintain a specific Rate-of-Climb is easy to calculate.
Equation (i): Pup = Vup x m x g — [power = Rate-of-Climb x mass x gravitational constant]
For example, take the 10 mph on a 5% slope discussed above with the cyclist+bike weighing 70 kg. This becomes:
0.5 mph x .447 (M/s)/mph x 70 kg x 9.8 M/s2 = 153 watts (NM/s)
This is the minimum wattage needed to maintain that Rate-of-Climb. More power is needed to overcome the frictional, rolling, and aero losses. Those losses are a function of velocity (the losses are smaller at lower velocities). We will talk about that in a minute, but let’s take one last look at Equation (i) written a different way:
Vup = Pup/(m x g)
To maximize Rate-of-Climb, Vup, we want to maximize power and minimize mass (g is a constant). Hey… that’s watts per kilo! Now you understand the cyclist’s obsession with watts per kilo. For a climber, it is all about watts per kilo. In fact, you can quickly calculate your theoretical vertical speed in feet per hour by multiplying your watts per kilo* by the conversion factor of about 1200. For example, 2.0 w/kg* converts to 2400 feet per hour of elevation gain.
[*Note that throughout this article, “m” or “mass” is the combined weight of cyclist and bike. The “w/kg” numbers all use that definition of “mass.” The “w/kg” reported by Zwift on their data displays does NOT include the weight of the bike. To compare your w/kg with the data in this blog, you must add a bike weight. Zwift does not disclose the weights of their frames and wheels. I have used a climbing-bike weight of 15.7 lbs (7.1 kg) which was the average bike weight at the 2021 Tour de France. (See Table 4.) Strangely, the Rates-of-Climb I measured on Zwift are faster than theoretically possible by a few percent. Perhaps my bike set up is lighter than 15.7 lbs or I was inputting more power than the erg setpoint? We know Zwift uses the weight of the bike in their algorithm. See link in next paragraph.]
Maximizing power and minimizing weight is so logical, that equations are superfluous, but now you have a feel for what the Zwift engine is doing. To minimize mass you could lose some weight, but I will leave that up to you. You should go to your “Zwift Garage” and select the lightest frame and wheelset available. This has been written about by others here: https://zwiftinsider.com/fastest-bike-alpe/
To further maximize your Rate-of-Climb, Vup, you would like the majority of your power expended on elevation gain and not expended on rolling and aero resistances. To keep rolling and aero resistances small, you want your velocity low, which means picking the steepest climbs possible. Others have discussed the optimal Zwift routes (see https://zwiftinsider.com/easiest-tron/ ), but my experience is that the climb to the Radio Tower is best for highest Rate-of-Climb. The Radio Tower climb is consistently over 10% slope so V is low, meaning that most of your power is going into elevation gain.
Rates-of-Climb (ft/hr) on Radio Tower for various w/kg* are shown below. In most instances, the Rate-of-Climb exceeded the theoretical maximum. I can’t explain why that is happening, but it does confirm that the Zwift algorithm calculates the losses due to friction, roll and drag to be very small.
Table 1. Riding up the 450 foot climb of Radio Tower from bottom of Bowl (more data in Figure 1):
| watts/kg* |
Rate-of-Climb |
Theoretical |
% Diff |
| 1.59 |
1970 ft/hr |
1908 ft/hr |
-3.3% |
| 2.38 |
3066 ft/hr |
2856 ft/hr |
-7.4% |
| 3.04 |
3778 ft/hr |
3648 ft/hr |
-3.6% |
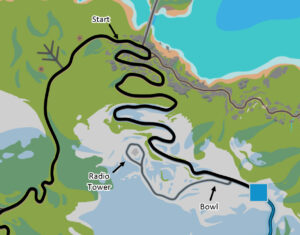
Reverse Epic KOM climb, Bonus Climb (Radio Tower), and “Bowl”. Base Image used by permission of Zwift.com.
HACK #1
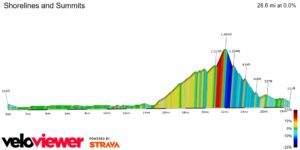
2D Elevation of Shorelines and Summits Route. Hack#1 starts at about the 26-mile marker and proceeds in reverse, up the Epic KOM to the Radio Tower. Used by permission of VeloViewer powered by Strava. See full details here.
The best way to get to the Radio Tower climb and still get in some climbing on the way is to select the Jungle Circuit Route. Do an immediate U-turn. Within the next minute you will get an intersection warning. Select to go right onto the Reverse Epic KOM climb. In about a minute you are into good climbing, with no power wasted on flats or downhill.
You will be using the U-turn function a lot in my hacks, so figure out how to use it effectively. I use the down arrow on my keyboard which is easily reachable. The key needs to be held for a second or two before the turn is executed.
HACK #2
Create a custom workout for your climbs and execute in erg mode. This will enable you to maintain a normal cadence and prevent you from overdoing it. A link to a custom workout that works for a wide variety of riders is given at the end of this article. It is mostly in Zone 2. Long aerobic workouts are best for accumulating elevation day after day.
HACK #3
When you get to the top of Epic KOM via the reverse route (~1100 feet of climbing) you will take a right turn onto what is called “Bonus Climb” or more commonly the Radio Tower. This is about 500 feet of very steep climbing. I usually do a U-turn as soon as the slope drops below 10% near the top of the climb, head back to the bottom, U-turn at the bottom and do it again, and again, and again.
Table 2. Riding up and down Radio Tower (the complete loop):
| watts/kg* |
Rate-of-Climb |
| 1.59 |
1997 ft/hr |
| 2.38 |
2953 ft/hr |
| 3.04 |
3617 ft/hr |
A “custom Zwift workout” could consist of alternating blocks of “climbing” and “descending.” You want to expend energy on the climb and save it on the descent. Make the blocks longer than it will actually take you to climb or descend, then make use of the “Tab” key. The “Tab” key skips to the next block. For example: create two blocks of 15 minutes @ 80% ftp and 2 minutes @ 40% ftp. If you get to the top in 9:09 (at 80%ftp), U-Turn, and hit the Tab key to skip to the descend block. When you are done descending and are climbing again, hit the Tab key to skip to the next “climbing” block.
HACK #4
Do you remember your physics lessons on potential energy conversion to kinetic energy? Usually, the teacher released a ball at the top of a ramp. The ball accelerated as it descended. Maybe there was an up-ramp abutting the down-ramp. The ball ascended the up-ramp, stalled, descended again, then oscillated between the two ramps. Without frictional and rotational losses, the ball could oscillate forever as potential energy is converted to kinetic energy and back, much like skateboarders with their half-pipes. If you could find two opposing ‘ramps’ in the Zwift world, could you accumulate more feet of climbing by oscillating back and forth than by doing a long climb like Radio Tower?
Equation (ii) for a frictionless ramp shows that a doubling of the slope will double the Rate-of-Climb. Doubling the height of the incline (making the ramp longer) only increases the Rate-of-Climb by 21/2.
Equation (ii): Rate-Of-Climb = (g/8)1/2 x s x (H)1/2 — where H is the vertical height of the incline, s is slope and g is gravitational constant
For example, a ramp of 11% slope and a height of 21 feet gives a Rate-of-Climb of 3637 ft/hr. [Note this is approximately the conditions of the 1.59 w/kg* experiment in Table 4, which had a Rate-of Climb of 3792 ft/hr.]
There is an interesting “Bowl” (two-sided-ramp) at the start of the Radio Tower climb. Both sides have maximum slopes greater than 12%. I tested this “Bowl” at several w/kg*.
Table 3. Rate-of-Climb in Bowl vs. Radio Tower Loop:
| watts/kg* |
Rate-of-Climb in Bowl |
Advantage vs Up/Dwn Radio Tower at same w/kg |
Theoretical w/kg for this Rate-of-Climb |
| 1.59 |
3792 ft/hr |
90% |
3.2 w/kg |
| 2.38 |
4704 ft/hr |
59% |
3.9 w/kg |
| 3.04 |
5548 ft/hr |
53% |
4.6 w/kg |
To my shock, I accumulated almost 60% more feet in elevation per hour by cycling back and forth across this bowl than going straight up and down the Radio Tower! To get that rate-of-climb using equation (i) would require 3.9 w/kg (for me that equates to 265 watts or 126% of my ftp!) At 1.59 w/kg the results were even more astounding: a 90% increase in Rate-of-Climb! The lower speeds at lower w/kg correspond to less aero and rolling losses. Conversely, if you do this Bowl at higher w/kg, you will experience less advantage, but it will still be worth implementing the Hack.
HACK #5
There is something very interesting about Equation (ii) … “mass” does not appear in this equation! This would indicate that riding the bowl should not be adversely affected by a heavier bike? In fact, high speeds are attained at the bottom of the bowl where aerodynamics come into play. You can take advantage of this by switching to a heavier aero frame and wheels when you get to the Bowl. Switching bikes in-game is easy to do. [See www.zwiftinsider.com/change-bikes-quickly/]
I confirmed this in a test with two different bikes in the Bowl. [Note…My choice of equipment was limited by what was in my garage (many frames and wheels are level-locked).] The Time Trial bike’s Rate-of-Climb was over 7% more than the Climbing bike … over 300 extra feet per hour! To achieve either of those Rates-of-Climb on a normal uphill would require around 4 watts/kg!
Table 4. Aero vs Lightweight in the Bowl
| Set-Up |
Lightweight Climbing |
Time Trial Aero |
| Frame |
Cannondale EVO |
Canyon Speedmax |
| Frame Zwift Aero Stars |
2 |
4 |
| Frame Zwift Weight Stars |
4 |
1 |
| Wheels |
Zipp 353 NSW |
Zipp 454 |
| Wheels Zwift Aero Stars |
3 |
4 |
| Wheels Zwift Weight Stars |
3 |
3 |
| Assumed weight for w/kg |
7.1 kg |
9.1 kg |
| Power Input |
70% ftp |
70% ftp |
| Watts/kilogram* |
2.22 |
2.16 |
| Rate-of-Climb in Bowl |
4493 ft/hr |
4824 ft/hr |
CONCLUSION
Unlocking the Tron Bike is one of the coolest achievements on Zwift. These hacks can get you there quicker. Using Figure 1 you can predict how many hours it will take you to get there. If you can maintain 3 w/kg, your RoC on the Radio Tower climb is about 4000 ft/hr. You can accumulate the 164,000 feet in 41 hours. Interestingly, if you can only maintain 1.5 w/kg, but you spend your time in the ‘Bowl,’ you have about the same RoC.
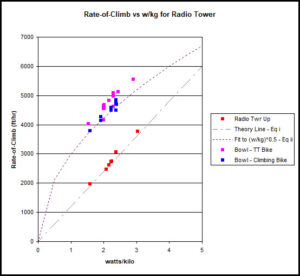
Figure 1. Rate-of-Climb for different scenarios
In the process of learning about these HACKS and why they work, I hope I have refreshed your understanding of some of the physics of cycling. Knowing the science can help you bike smarter.
==============================================================
*All references to “w/kg” include the weight of the bike and are not directly comparable to “w/kg” reported on the Zwift data screens which only includes the weight of the rider. To convert, multiply the Zwift number by (cyclist kg)/(cyclist+bike kg).
CUSTOM ZWIFT WORKOUT
I have created a workout that leads you through the HACKS. You can download it from here:
https://www.dropbox.com/scl/fi/tefhztfep6vvivw2xus45/Jungle_Circuit-Tron_Hacks-V01-02.zwo?rlkey=x0wyynfi8mrm2qpydg2bl8fi3&dl=0
After you have downloaded it, save it to Documents/ZwiftWorkouts/[YourZwiftID] and then start Zwift. [If you are having trouble, video instructions are here: Importing Custom Workouts – Instructions | Zwift] This workout is called Jungle Circuit-Tron Hacks-V01-02 and will now appear under the “Custom Workouts” category in the workouts list. It is designed to be ridden in “erg” mode on the JUNGLE CIRCUIT route in Watopia.
Do not be alarmed at the “length” of the workout. It is made to suit a wide variety of riders. You will be “tabbing” through some of the long blocks. If you are a less powerful rider you will be instructed to “tab” (skip) many of the blocks. Most riders will get the full experience in 60 minutes.
You will need access to a keyboard to use the workout effectively. Here are the keyboard shortcuts to know:
| Action |
Keyboard Shortcut |
| U-Turn |
Down Arrow (Press and Hold) |
| Select turn at upcoming intersection |
Right Arrow |
| Skip out of current workout block |
Tab |
| Stop Game to change bikes |
A |
| Open Garage to select frame and wheels |
T |
The post The Zwift Tron Bike: HACKS TO UNLOCK QUICKER! appeared first on Team Athletic Mentors.


 Our Hockey Site
 Team AM


